IMPORTANT NOTE: The TSYS (TransFirst) Support Team is responsible for installing, testing, training, and troubleshooting the device. Please contact TSYS (TransFirst) at (800) 654-9256.
TSYS will provide the office a necessary and helpful reference User Guide.
The Denticon Support Team does not handle the TSYS installation, testing, training, and troubleshooting of the TSYS hardware, nor its functions.
GETTING STARTED
Upon successfully signup with TSYS (TransFirst), an enrollment letter with the information necessary will be sent from TSYS (TransFirst) to the office’s applicant. Once the information is obtained from TSYS (TransFirst), the VX805 terminal unit will need to be setup prior to processing credit card transactions.
NOTE: Denticon does not provide the TSYS (TransFirst) information.
SETTING STATIC IP
The first step on the device is setting the IP address and making sure the device has its IP settings set to “static.” This will require some setup on the terminal itself.
Steps to follow after receiving the terminal and plugging in the power supply:
- At the welcome screen, select * (asterisk / star)
- Enter password 1AlphaAlpha66831 (The small round “Alpha” button is located at the top of the unit)
- At the next menu, press 1
- Select the diamond symbol in order to for the IPAd address to display on the screen
- For future reference, manually record (write) the IPAd Address displayed on the screen. After a couple of minutes, the screen will return to the menu.
- Once the IP address is known, hit the red x button to return to the VCS Ethernet screen
- Select the calculator image
- Select IP from the Ethernet configuration screen
- At the IP configuration screen, select “Edit”
- At the IP Settings Static, select “Static”
- At the IP Configuration Screen, Select “Next”
- Select Edit, Enter IP address collected in the step above
- Select the Green Button to confirm entry
- At the IP configuration screen, select “Exit”
- Select “Yes” to Save Changes
- A message will be presented indicating “connection repair successful press any key” which indicates the changes were completed successfully
- Allow the terminal to sit idle, allowing it to return to the main menu
NOTE: The TSYS (TransFirst) Support Team will assist with setting the IP address on the terminal. Please contact them at (800) 654-9256
INSTALLING THE TSYS/TRANSFIRST VX805 SOFTWARE
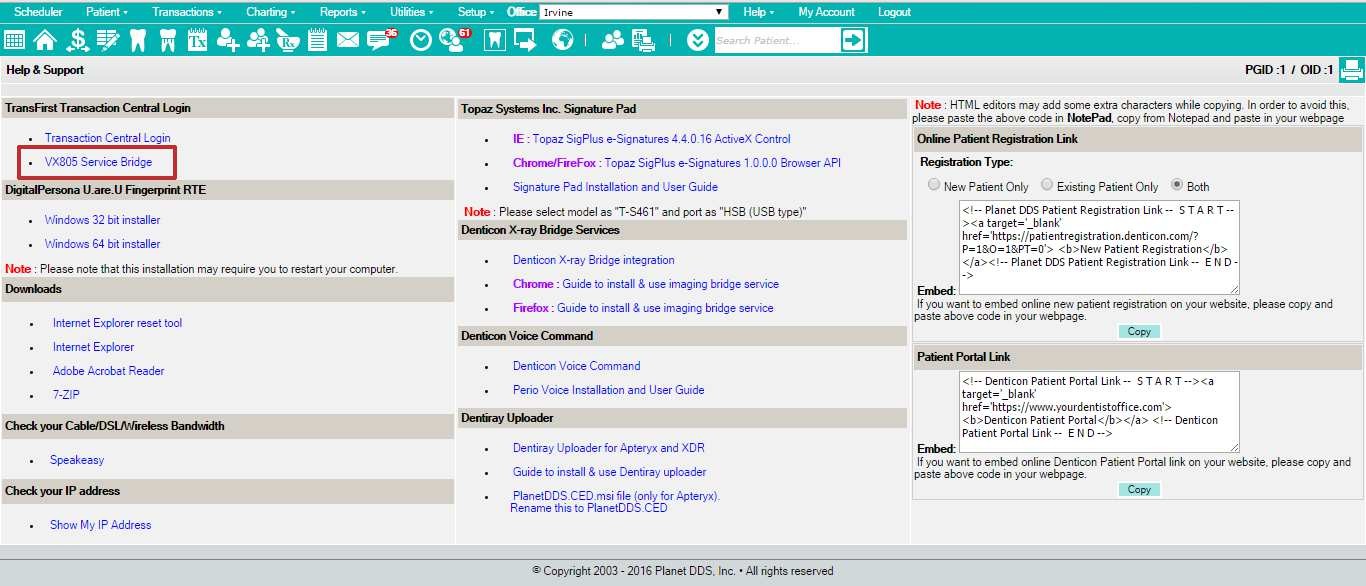
- Access Denticon’s “Help > Help & Support” screen
- Download the software by clicking the “VX805 Service Bridge” hyperlink
- After the download, right click the VX805Setup.exe and click “Run As Administrator”
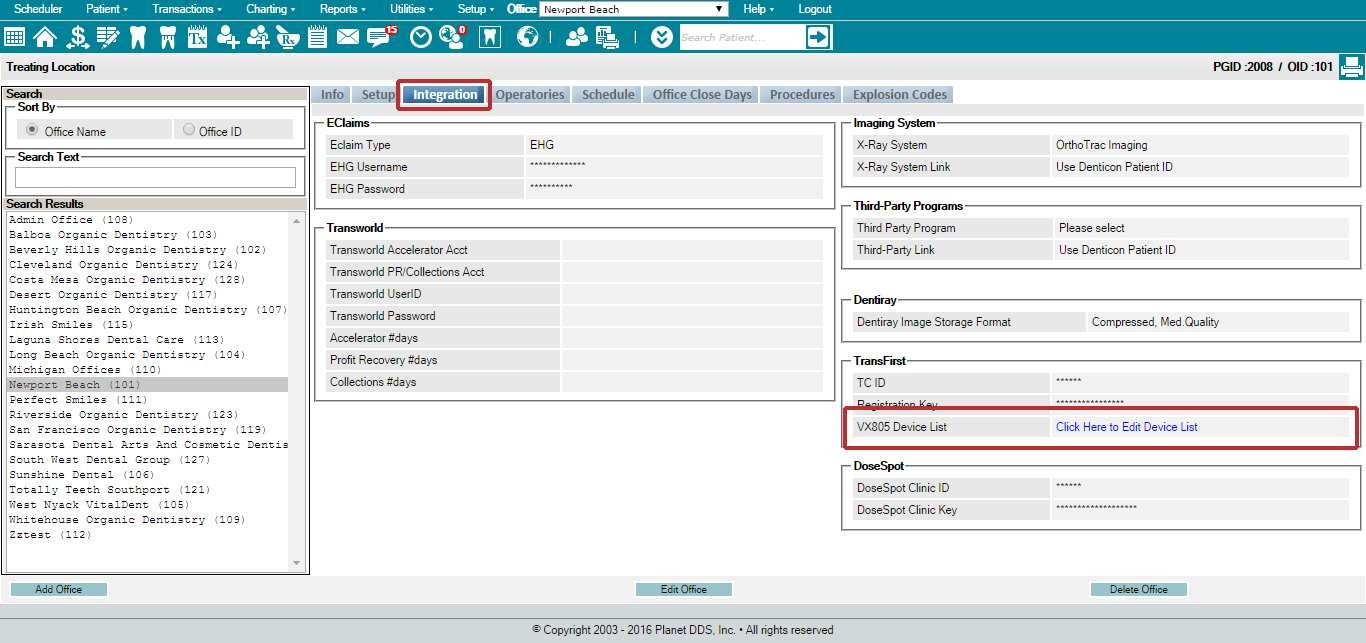
- When the installation is complete, go to Denticon’s “Setup > Offices” in order to select the “Integration” tab
- Click the hyperlink “Click Here to Edit Device List”
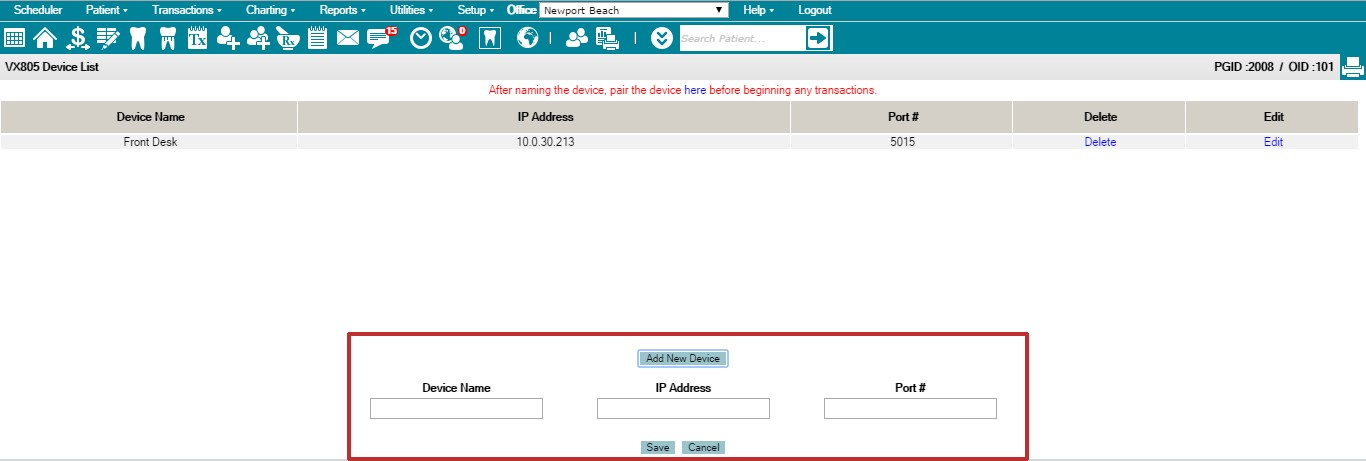
- Click “Add New Device” in order to complete the fields:
- For each office terminal:
- Device Name: enter any easily identifiable name such as Front Desk, Back Office, etc.
- IP Address: enter the IP Address of the office’s VX805 device (see guidance in section “SETTING STATIC IP” above
- Port #: enter 5015
- Click the Save button
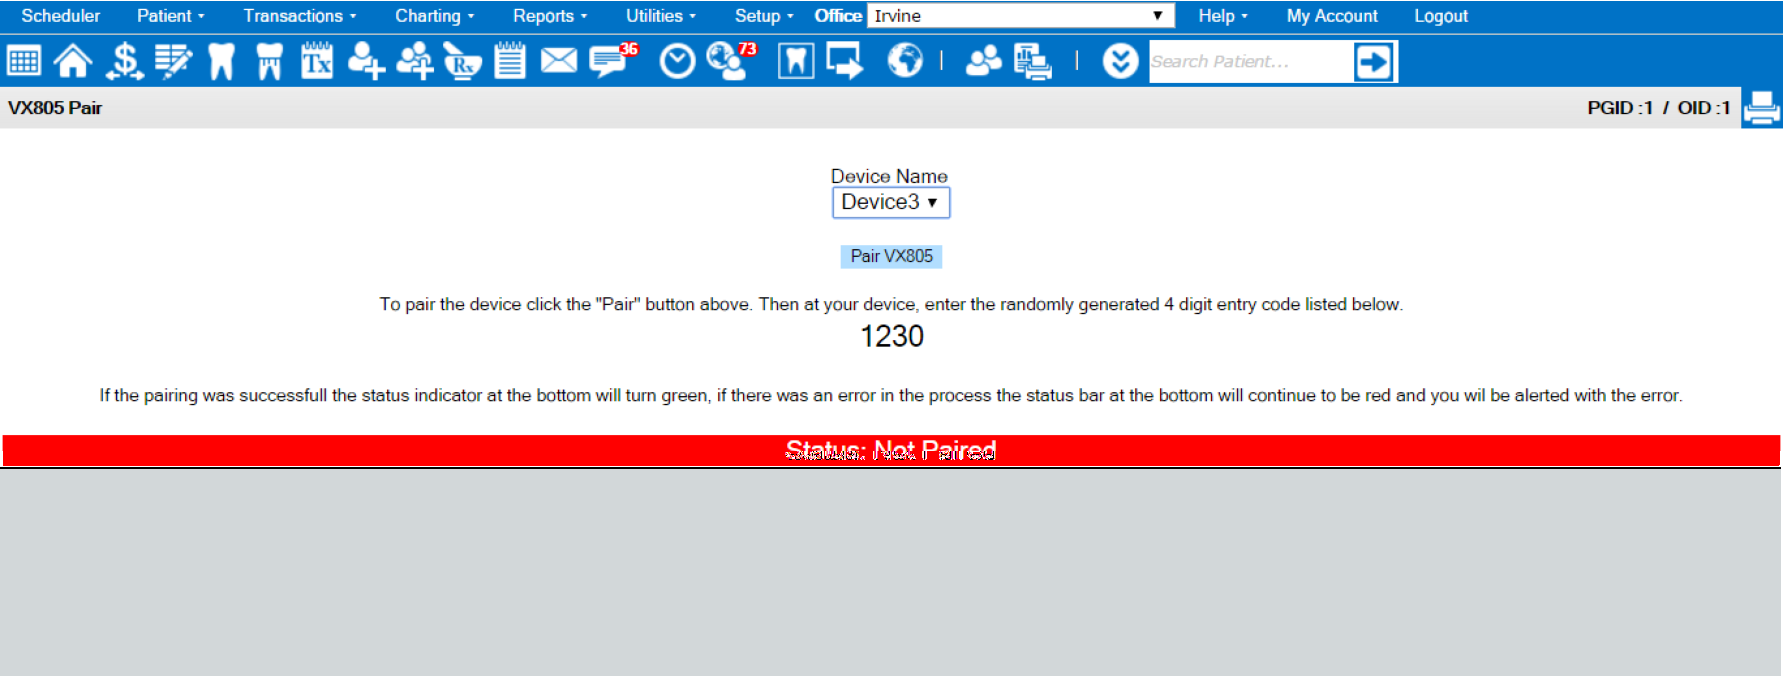
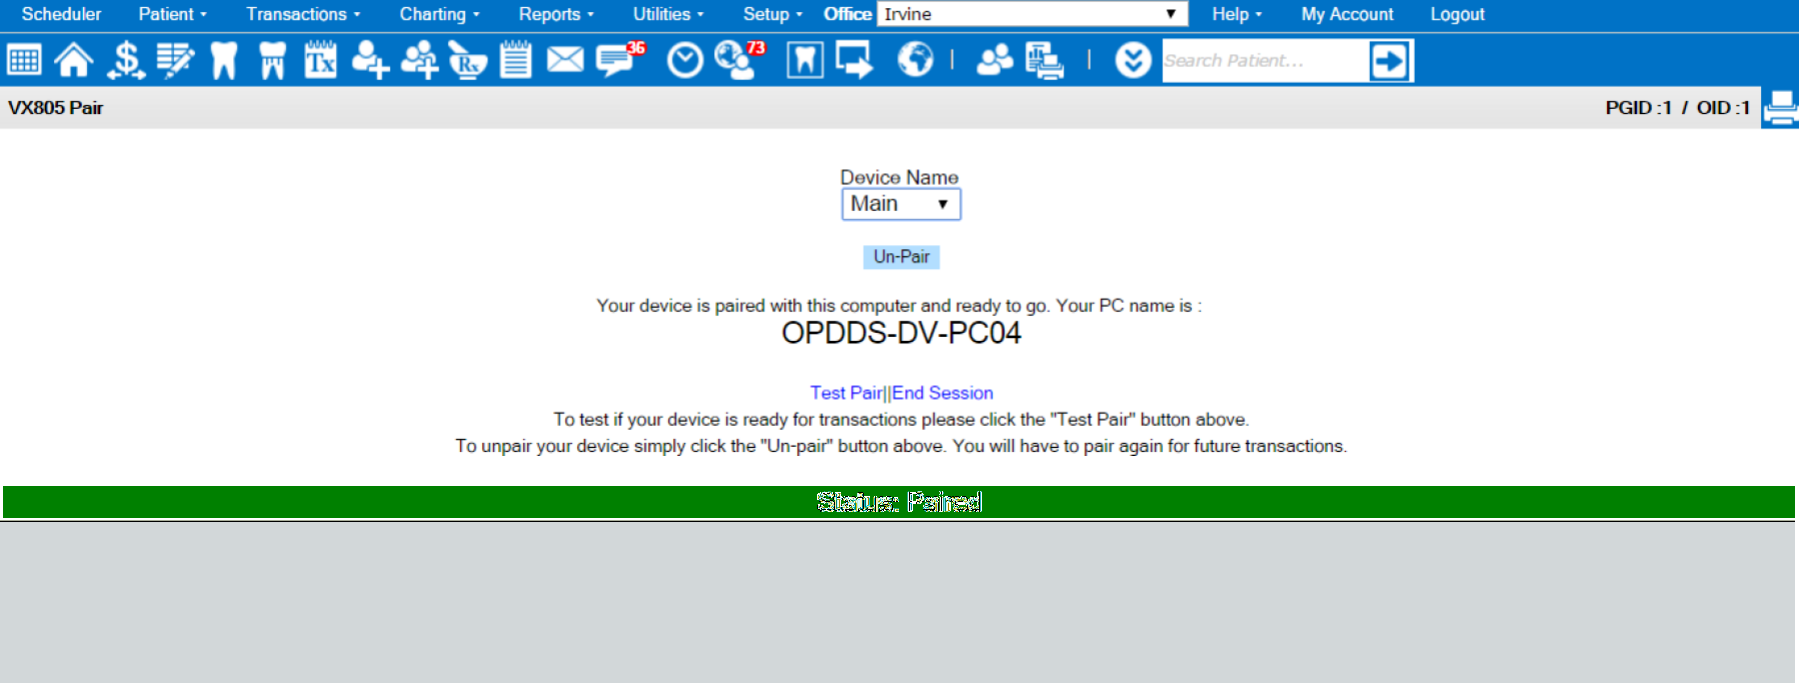
- Click the hyperlink at the top of the page, “After naming the device, pair the device here before beginning any transactions” OR go to Denticon’s “Setup > Security > Pair 805 Device” screen
- The “Device Name” dropdown will show a list of the devices which were added in the previous step
- Select the desired device for pairing
- Click the Pair VX805 button in order for the Denticon screen to present a 4-digit numerical code
- Type the 4-digit numerical code on the terminal’s keypad
- Upon successful pairing, the Denticon screen will present a “Status: Paired” message, along with the PC name in bold
- If a confirmation is desired, click the “Test Pair” hyperlink
- Do not close the windows
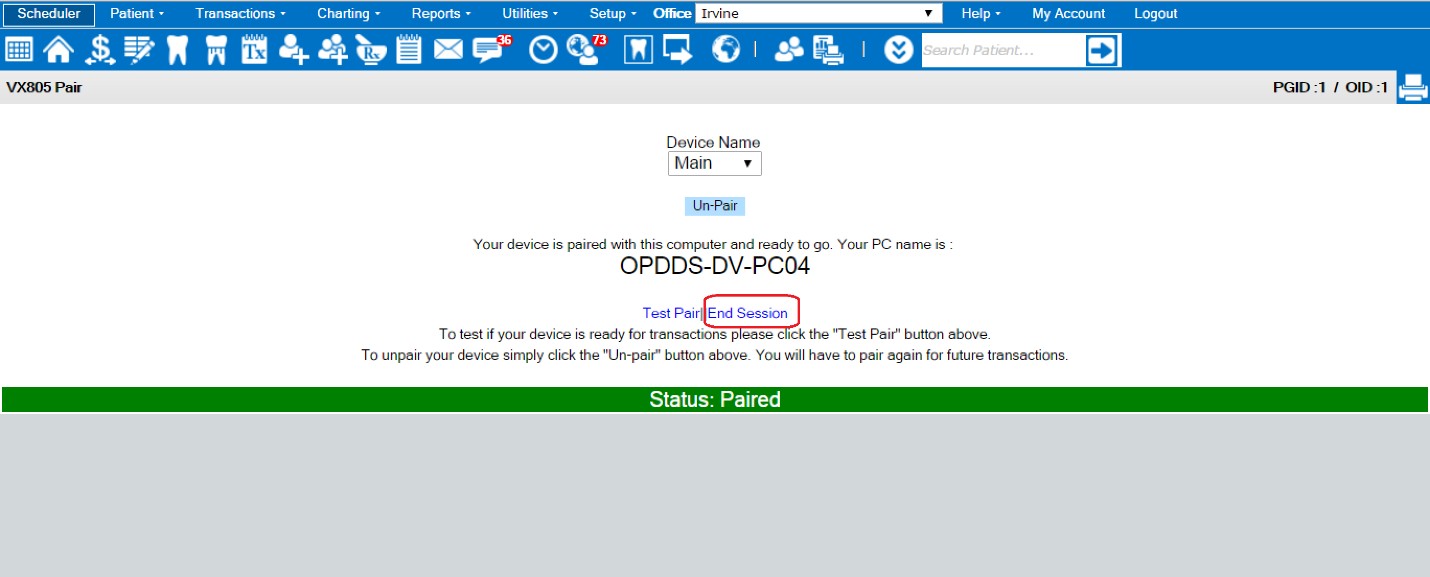
- If the communication is desired to end, click the “End Session” hyperlink
- Once the credit card processing terminal is successfully paired, there is a button on the patient payment screen labeled Launch VX805
- For each office terminal:
VX805 TERMINAL SESSIONS
- For every Sale and Void transaction on the VX805, the device must start within a Denticon session with the user’s computer
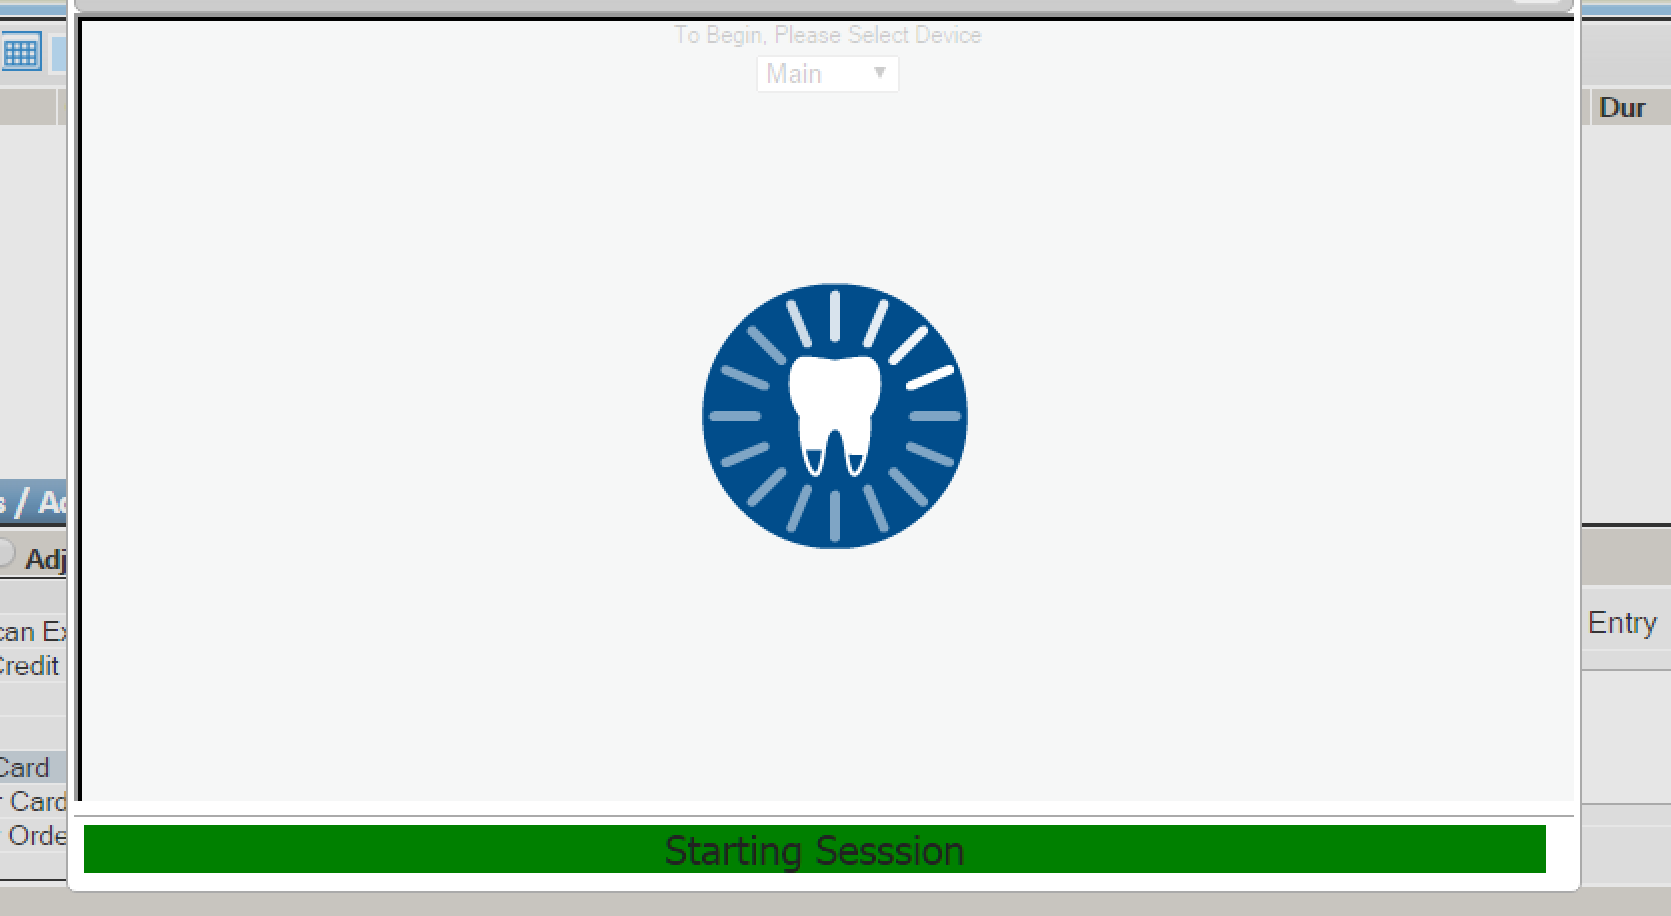
- When the device is opening a session the user will be presented with the “Starting Session” screen
- Once a session is started the transaction begin processing
- The user will interact with the device, providing confirmation information on the terminal
- After each transaction the device will automatically close the session so it may process transactions with other computers
- If an error occurs after a session is started, the device will be stuck in an open session and is able to continue transactions only with the computer with which it was originally opened
- The originating device will need to end the session from the "Pair 805 Device" screen in order to release the terminal for usage in a different credit card transaction
CREDIT CARD / DEBIT TRANSACTIONS
- When the credit card processing terminal is successfully paired to the computer, there is a button on the patient payment screen labeled Launch VX805
- Click the Launch VX805 button
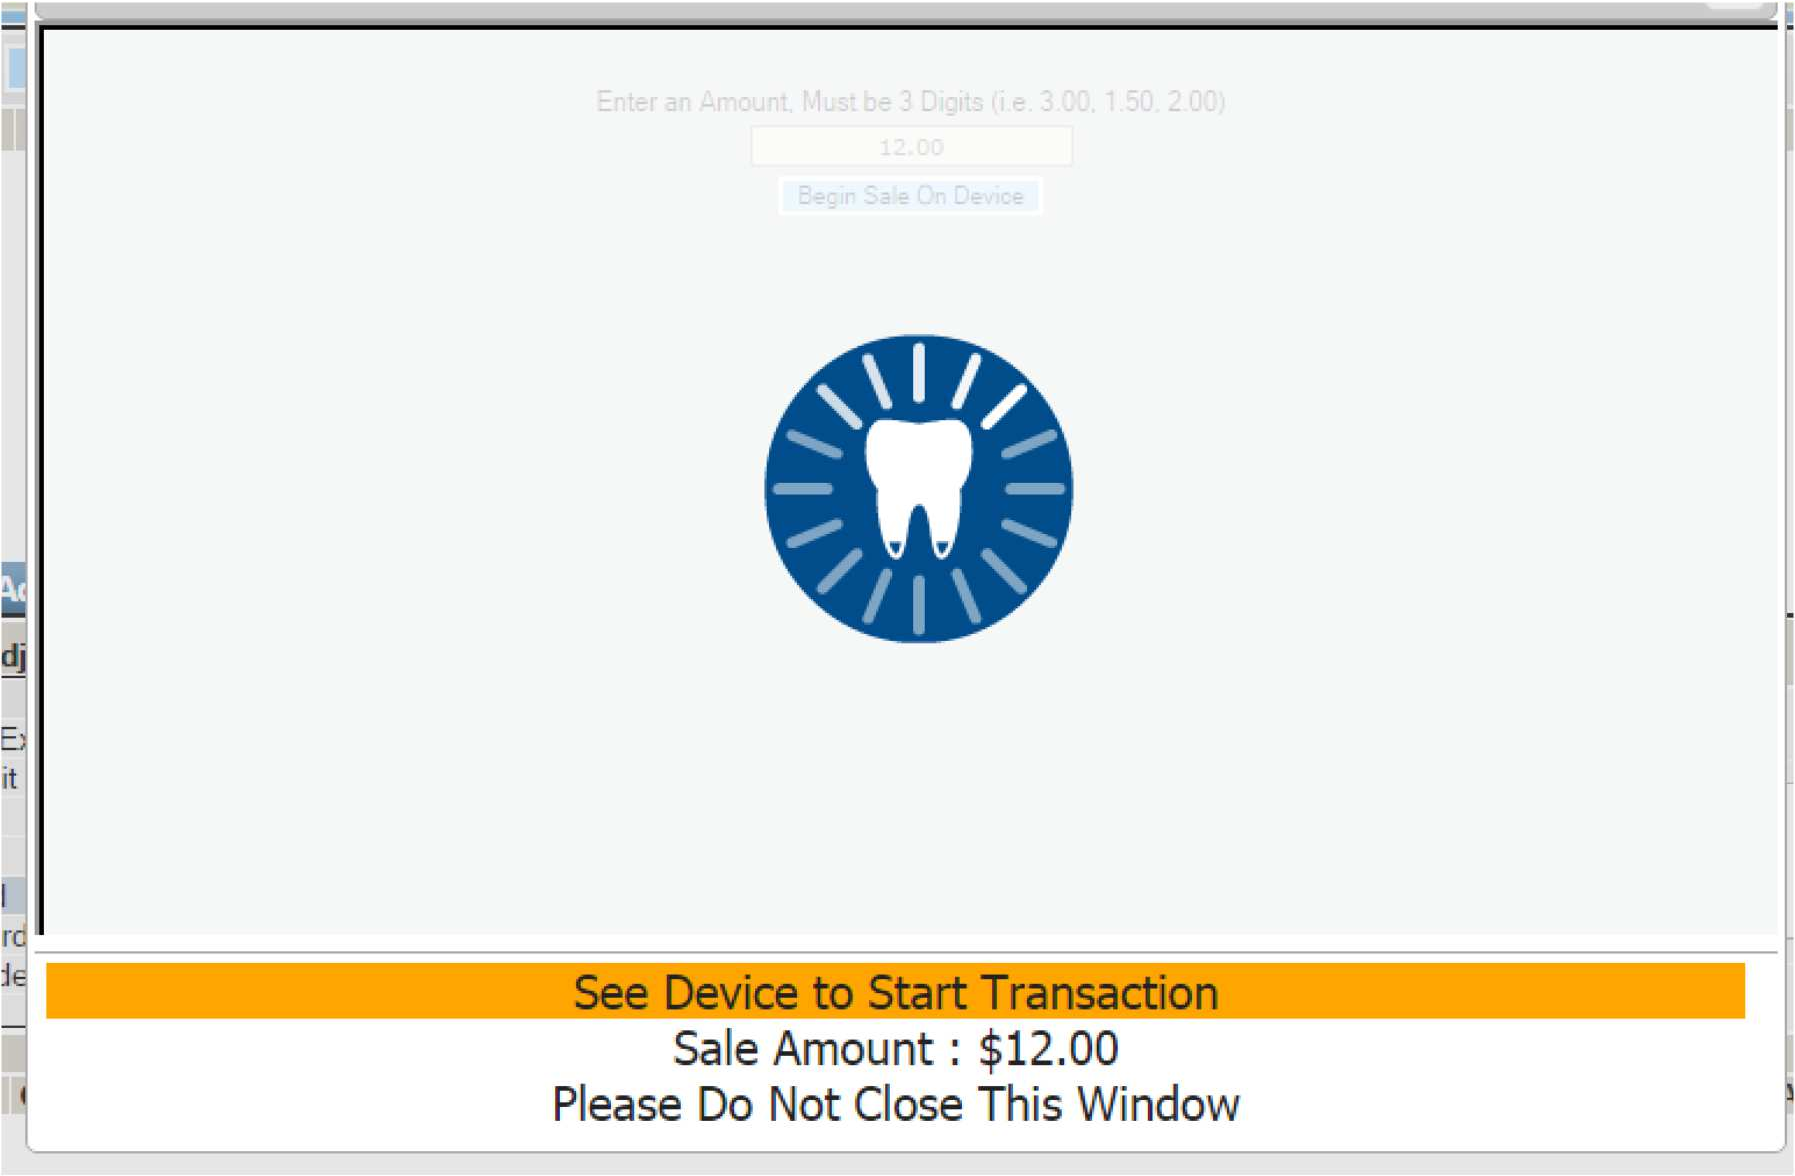
- A new window will appear with a status of the transaction on the bottom
- When presented with the ‘See Device to Start Transaction’ message, proceed to the terminal to follow the directions on the device’s screen
- Swipe the card (or insert the card’s chip) on the terminal device
- Confirm the amount on the device
- If using a chip on the card, wait until the device’s screen instructs to remove the card
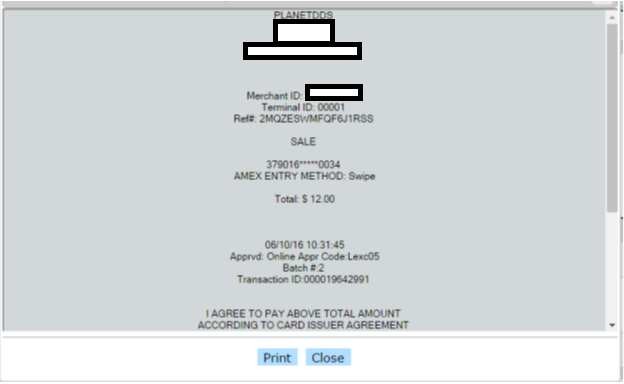
- If the transaction is approved, a printable receipt will appear on the Denticon screen, and the payment activity will be listed on the Ledger

PARTIAL APPROVALS
- Applies to Prepaid Credit Cards
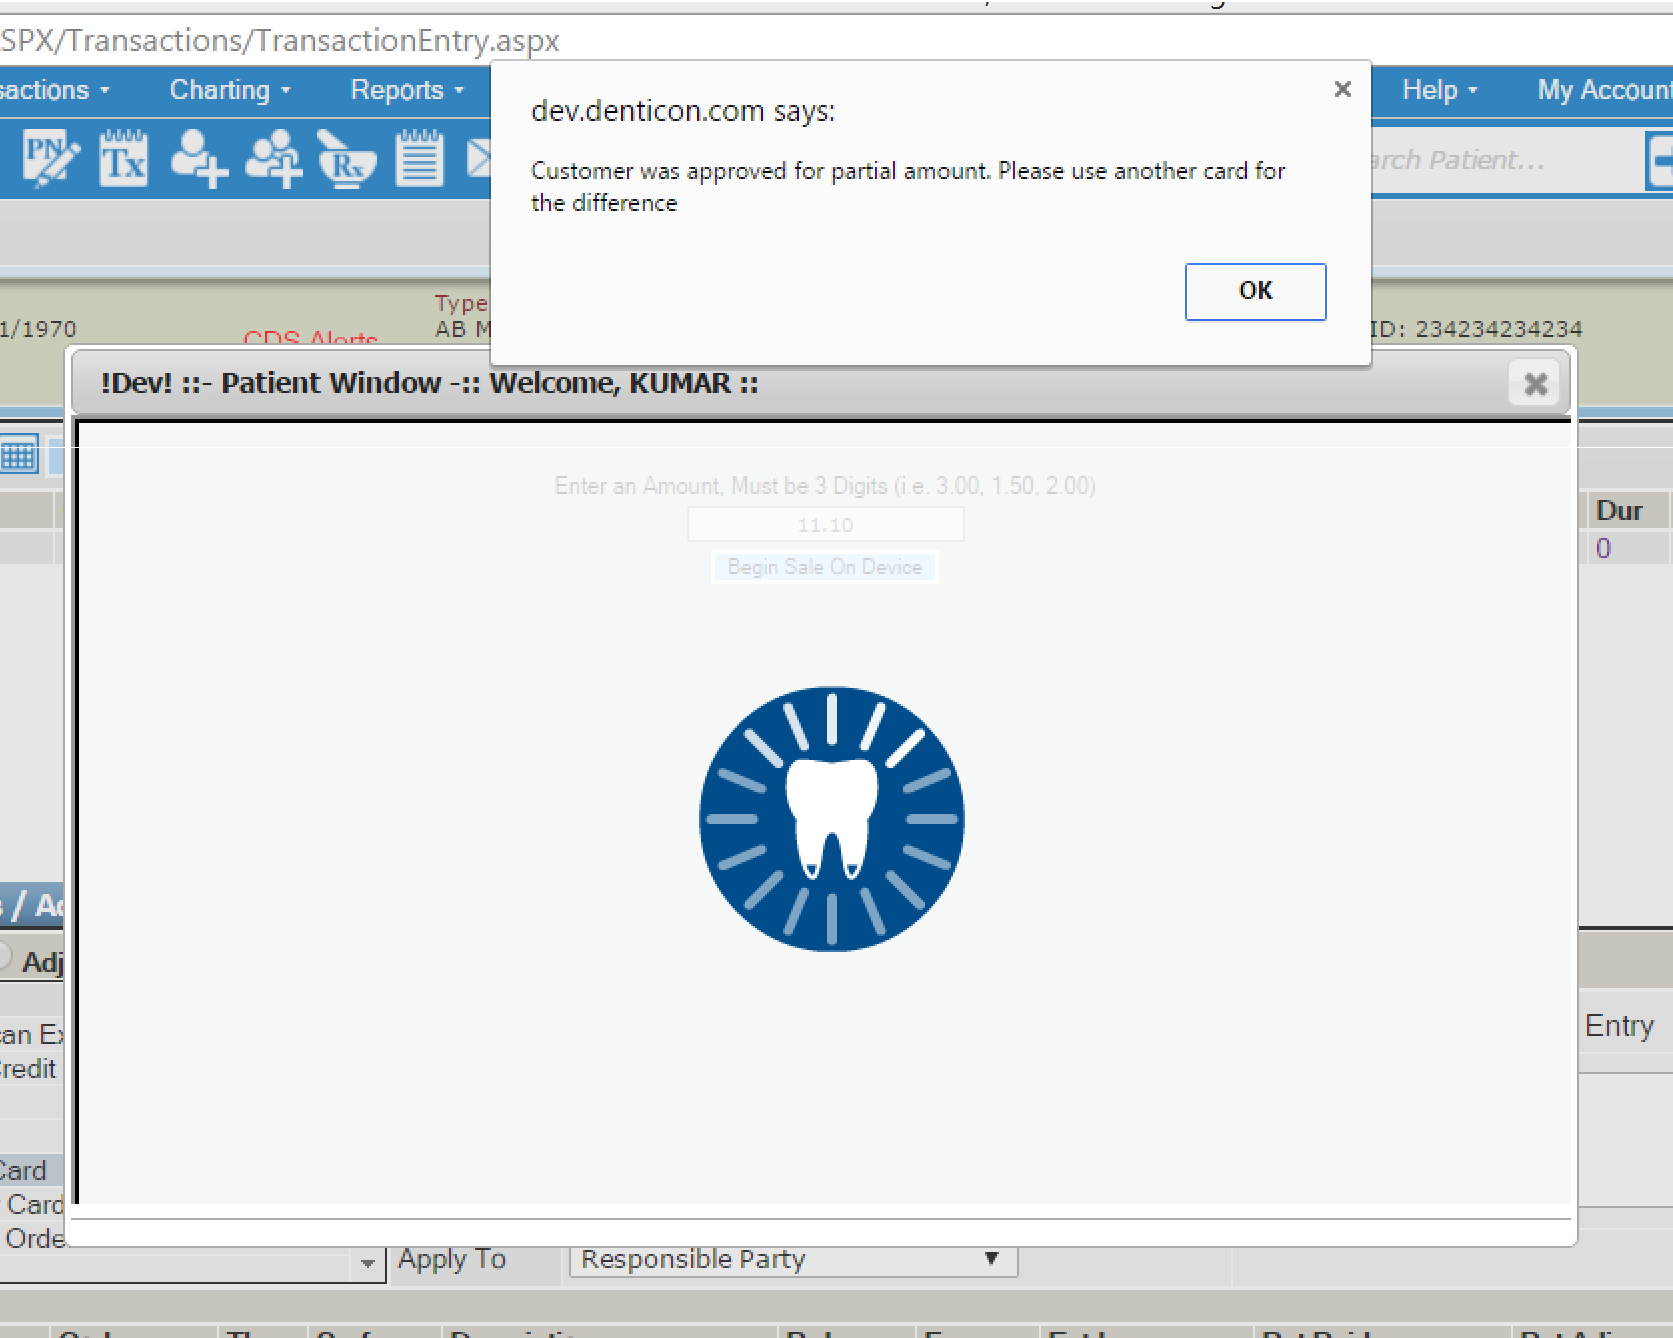
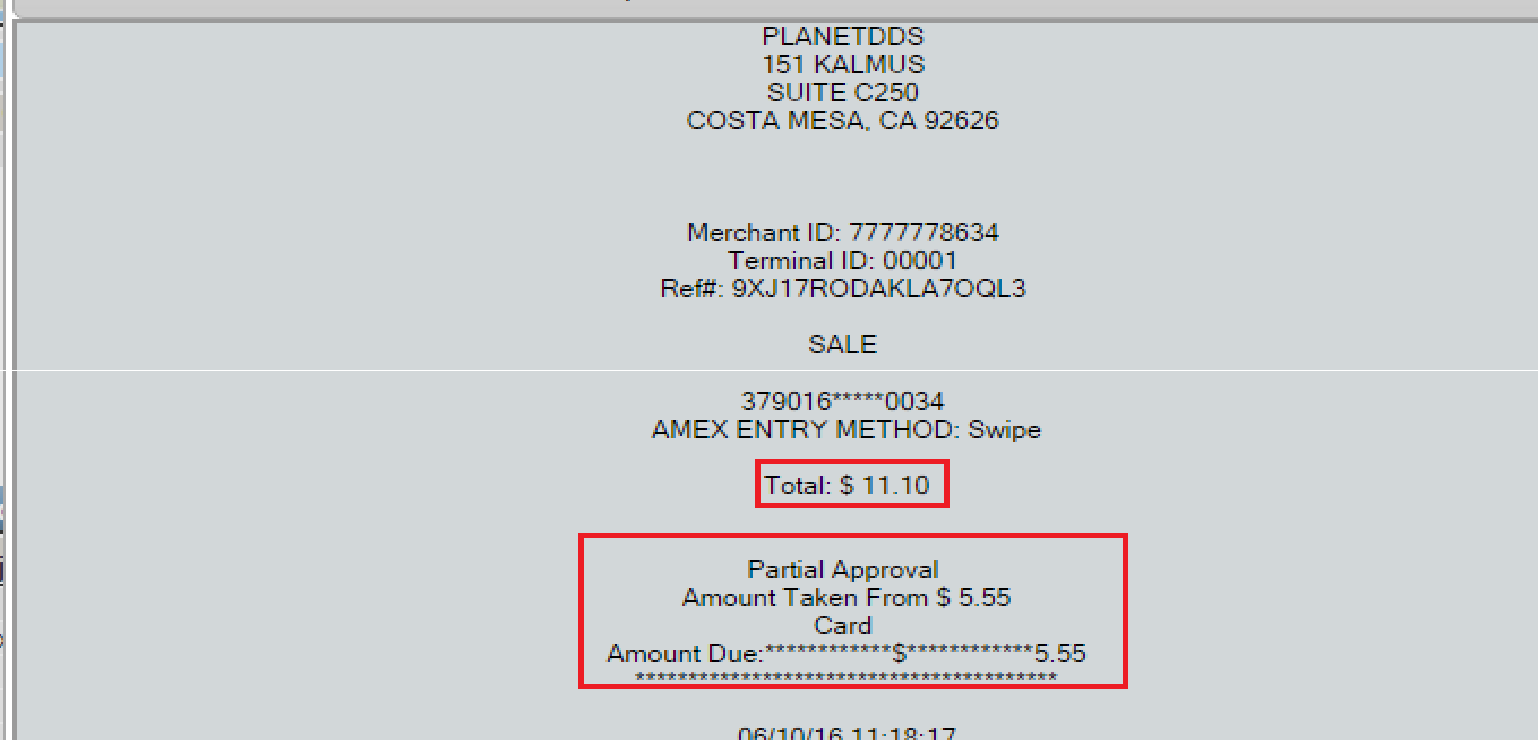
- If the card does not have the full amount available for the sale, the sale will be partially approved
- The sale will be approved only for the amount available on the card
- For any remaining amount due for the Denticon transaction balance, the user must generate another transaction for the remaining balance
- The user will be presented with a receipt that shows the approved amount is different than the sale amount
DECLINES
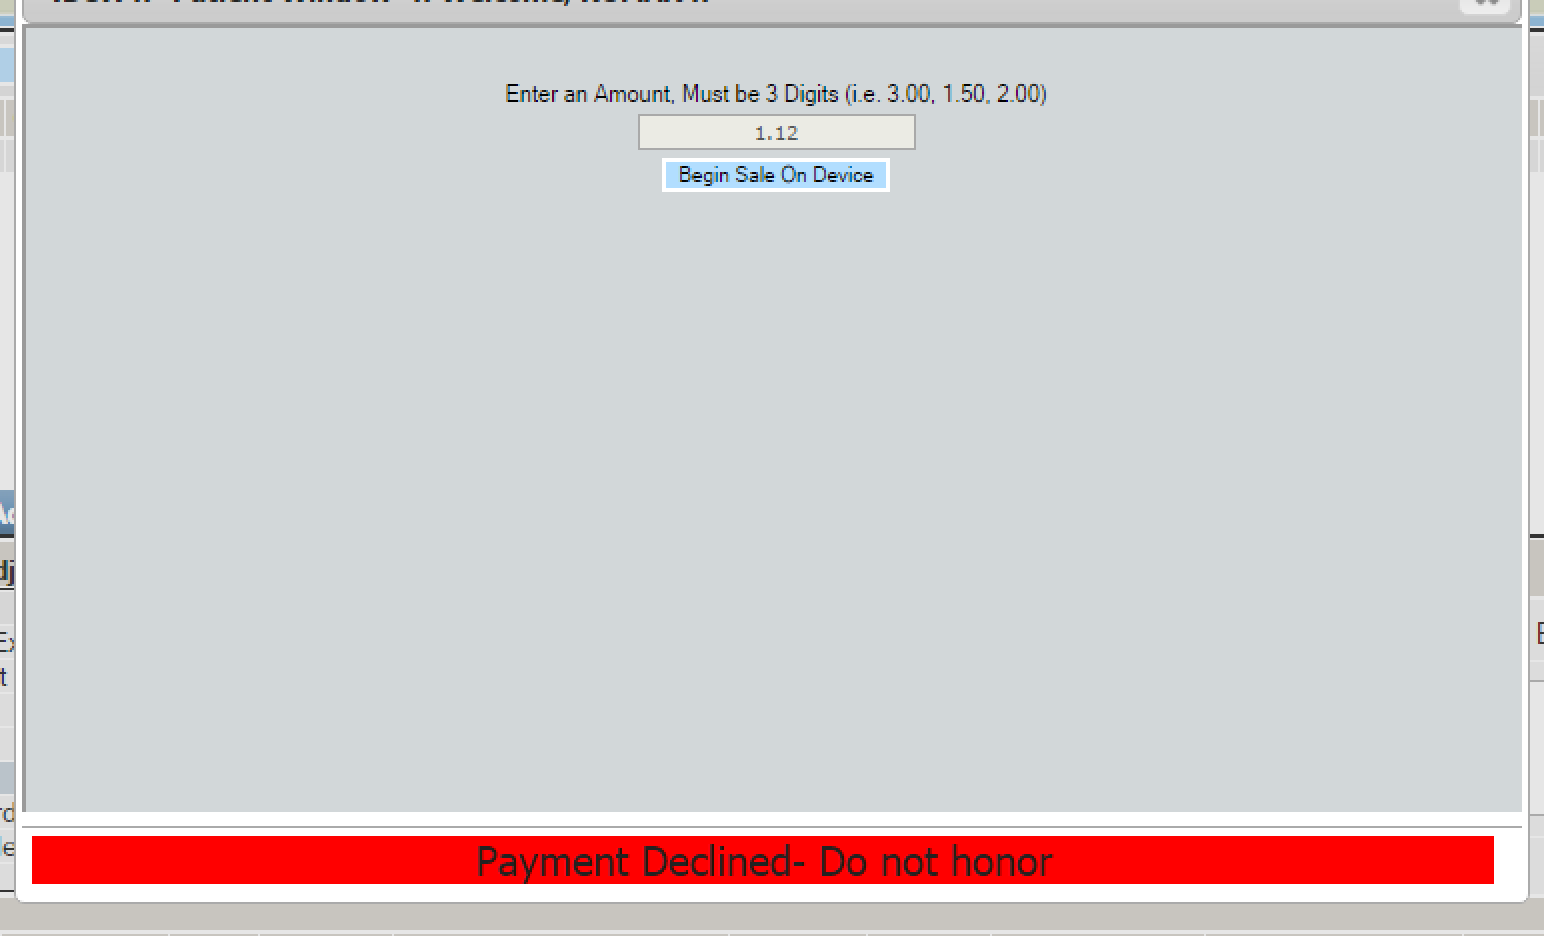
- If the transaction is not approved, a message stating the reason will appear on both the device and on the Denticon screen
- If the sale is declined and the user desires to attempt the payment with a different card, click the ‘Begin Sale On Device’ button and the process will start again
- NOTE: All payment transaction messages are passed through from TSYS (TransFirst). The messages are not a Denticon message.
VOID AND DELETE
If the payment is less than 24 hours old, the payment is able to be voided which will delete the transaction line from Denticon
- In the Ledger, click the date of the transaction for the details.
- If the payment is less than 24 hours old, a “Void and Delete” button will be available.
- If the “Void and Delete” button is not available, the transaction is more than 24 hours old which requires the need to issue a refund to the credit card
- When the void is complete, a printable receipt is available before you close
- The payment will then be removed from the ledger

REFUND SETUP
Before generating refunds, there is a requirement for a one-time setup of the adjustment type.
NOTE: Unless the office has manually deleted the type from Denticon’s default programming, this entry is present for immediate usage without needing to setup a new adjustment type.
If a new adjustment entry is necessary:
- Click the words “Setup > Payment /AdjustmentTypes” from the Denticon word toolbar
- Click the Add New Type button
- Code = AR005
- Description = REV PMT – TransFirst CC AutoRF
- Type = Adjustment
- Subtype = Collection
- Sign = +
- Class = Credit Card Refund (TransFirst)
- Click the Save button

ISSUING REFUNDS
- In the Ledger, access the account’s “Transaction Entry” screen
- Click on the “Payments/Adjustments” tab
- Choose the “Adjustment Types” radio button
- Select the “REV PMT – TransFirst CC AutoRF” item
- Past TSYS/TransFirst transactions for the patient will be listed
- Highlight the transaction entry to be refunded
- The amount will auto-populate into the amount box
- Click the Apply button
- The transaction will be refunded, and the credit card entry will be removed from the Transaction Entry screen

CONTRACT/RECURRING PAYMENTS
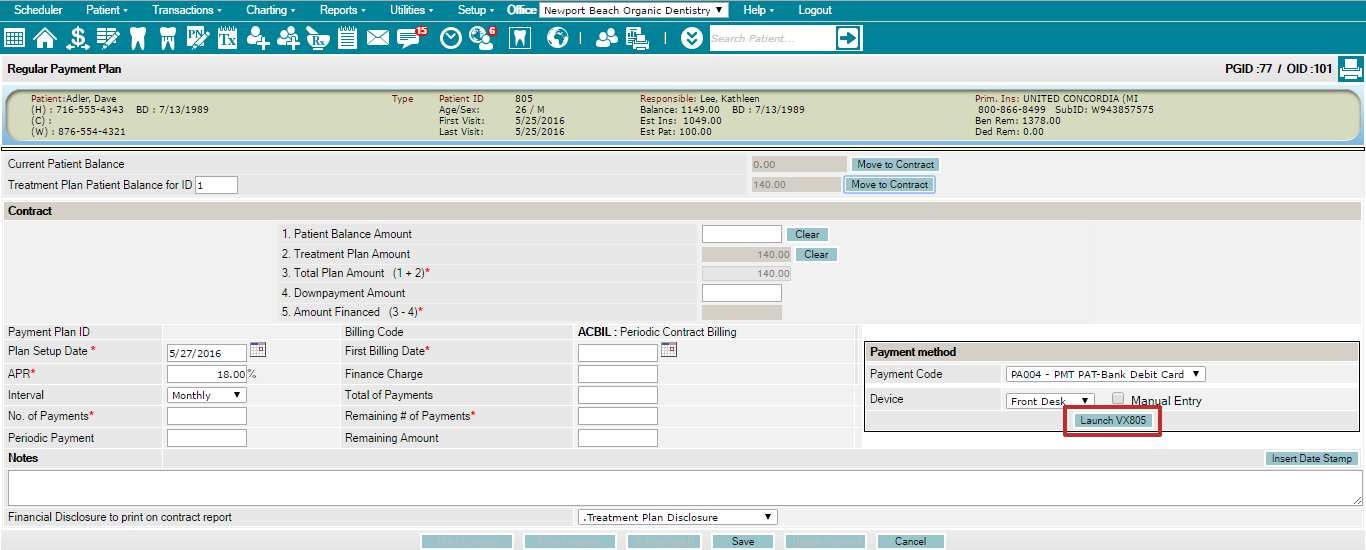
Regular Payment Plan
- After completing the details of the regular payment plan, click the Launch VX805 button
- If a down payment amount is entered into the payment contract’s field, the credit card will be charged for the down payment amount
- The credit card will be charged for the each installation payment
- A “wallet” (secured credit card reference) will be used for the future installation payments
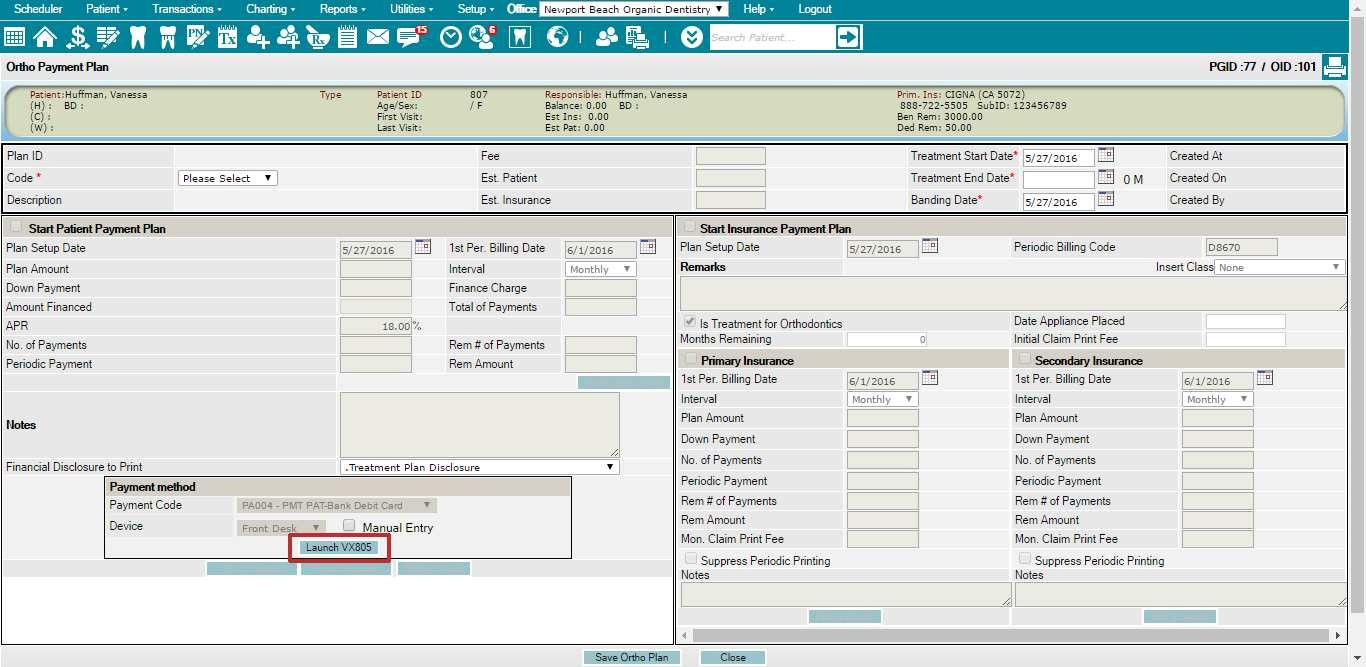
Ortho Payment Plan
- After completing the details of the ortho payment plan, click the Launch VX805 button
- If a down payment amount is entered into the payment contract’s field, the credit card will be charged for the down payment amount
- The credit card will be charged for the each installation payment
- A “wallet” (secured credit card reference) will be used for the future installation payments
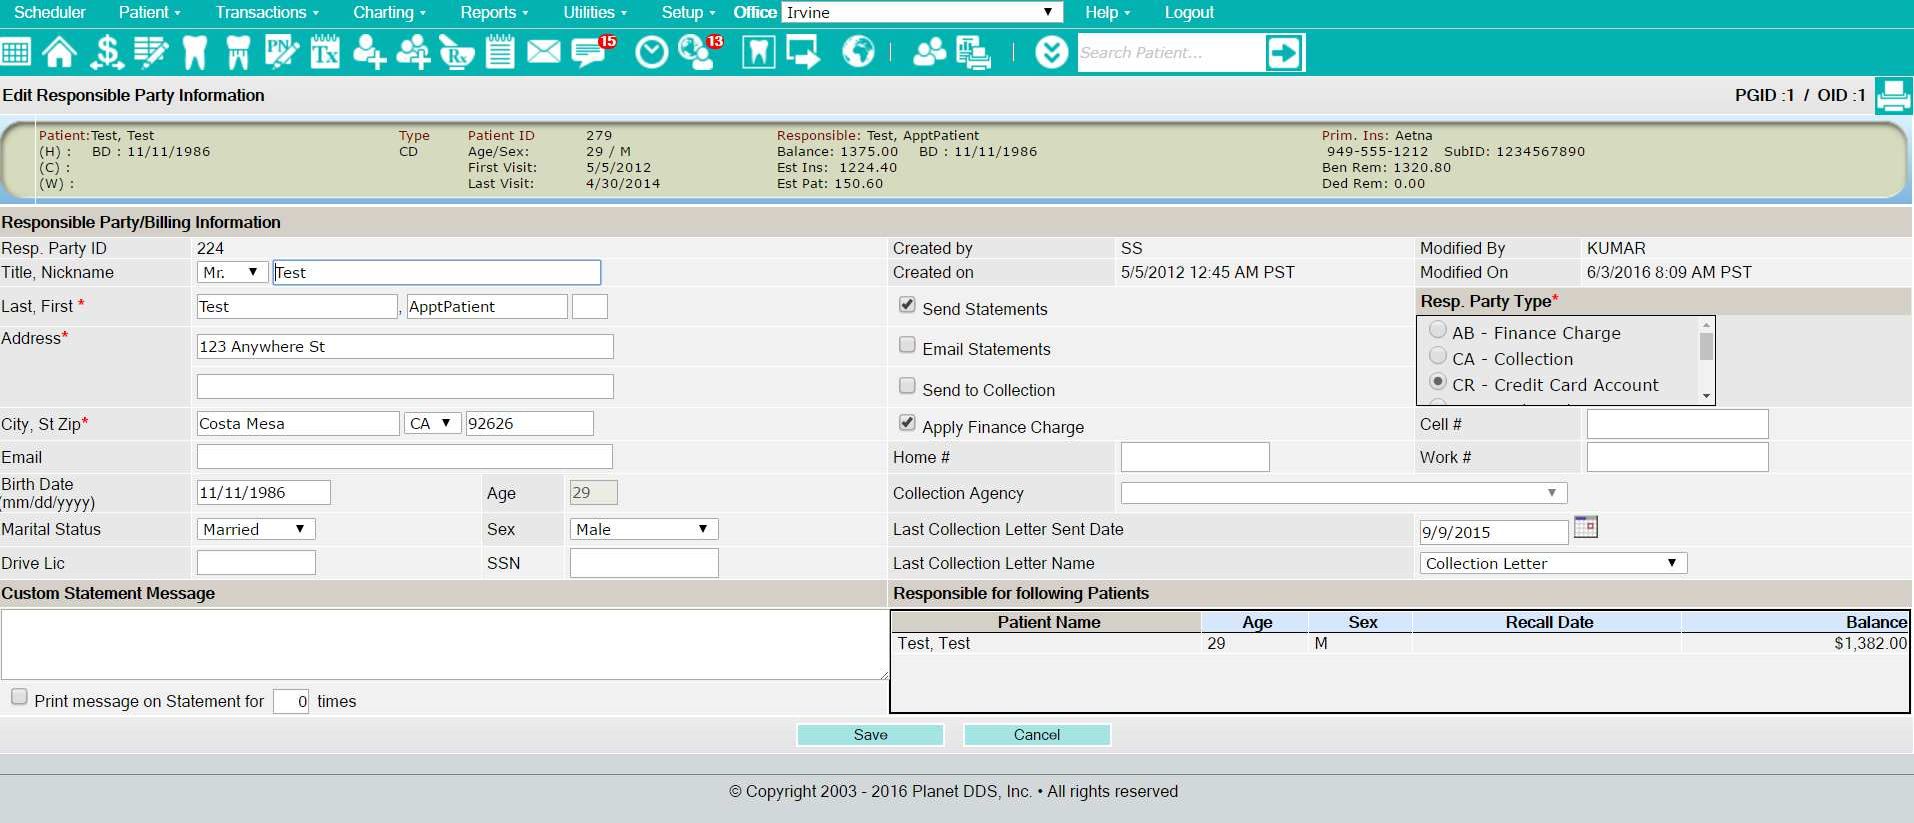
EDIT RESPONSIBLE PARTY BILLING INFORMATION
After a customer profile is saved, the Responsible Party information should be reviewed for accuracy of the address and zip code for the Responsible Party profile.
Denticon will use the Responsible Party’s address information to update the customer information in TransFirst.
The dental office should edit to ensure the accuracy of the recorded information. If the Responsible Party address and zip code information is incorrect, the office’s credit card processing charges will incur a higher cost.
GENERATING MONTHLY PAYMENTS
After a contract has been created, and a Customer and Wallet ID have been stored, the office is ready to generate sales.
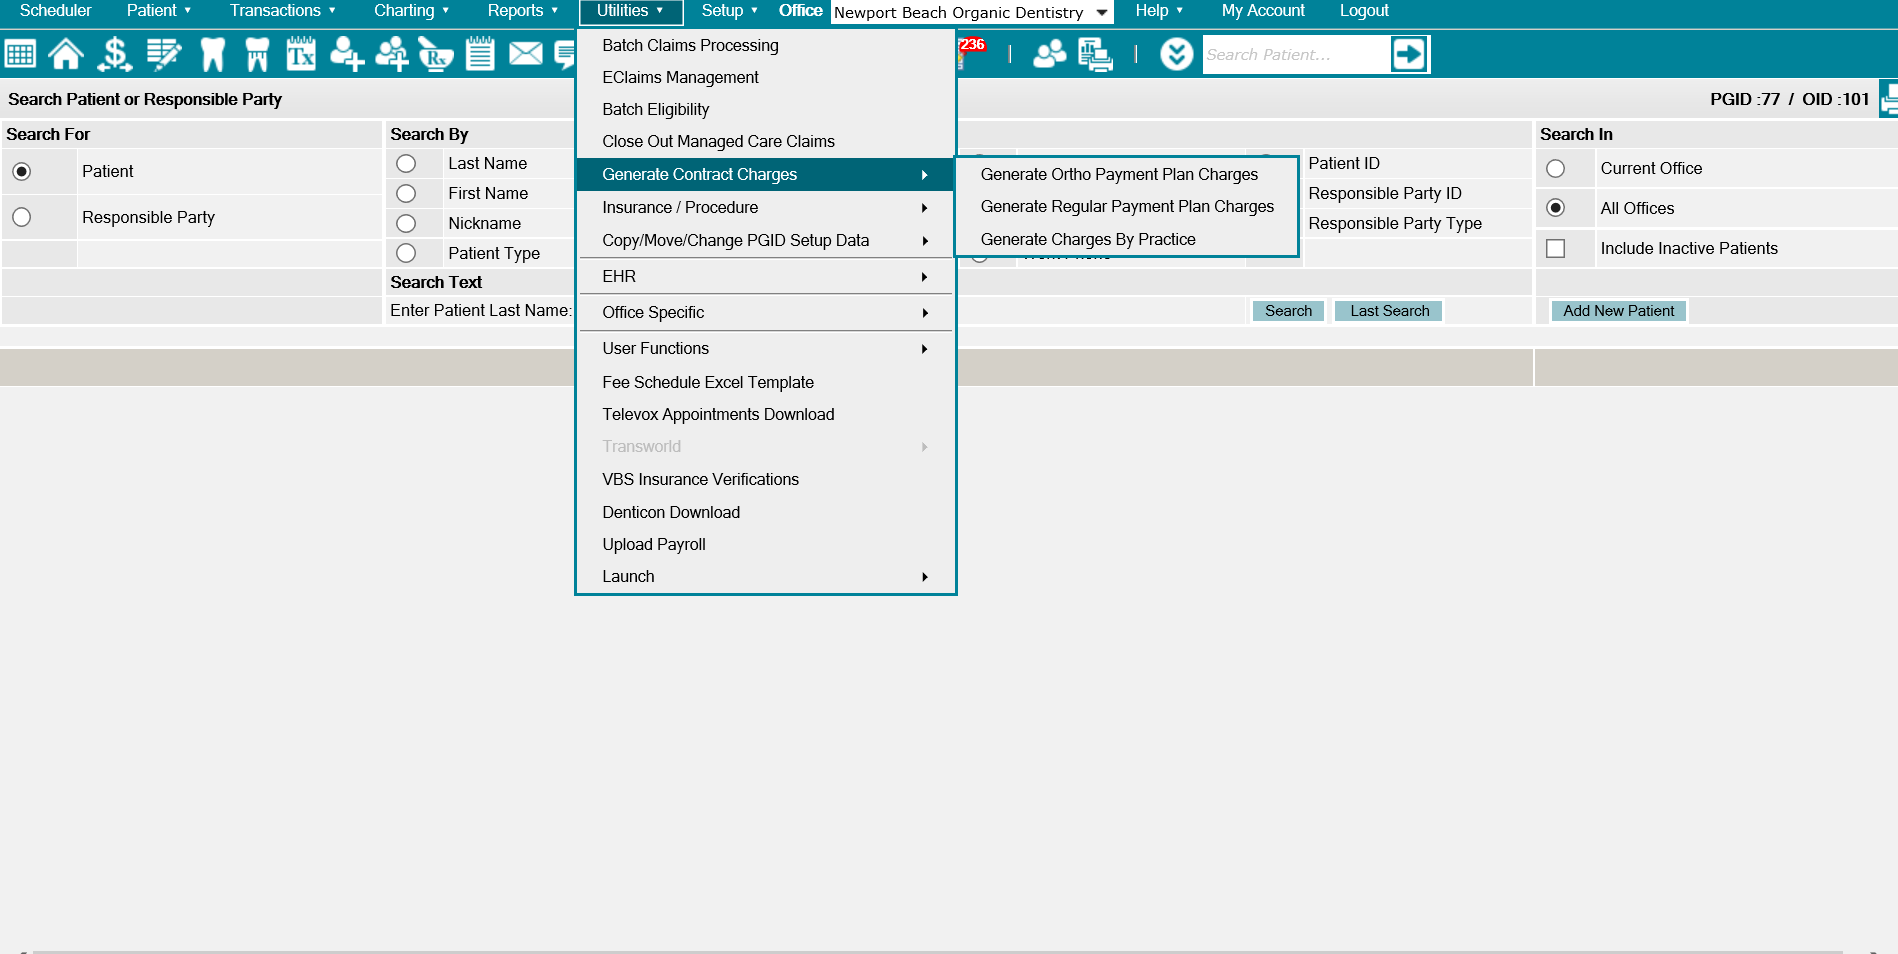
To review periodic contract payments due:
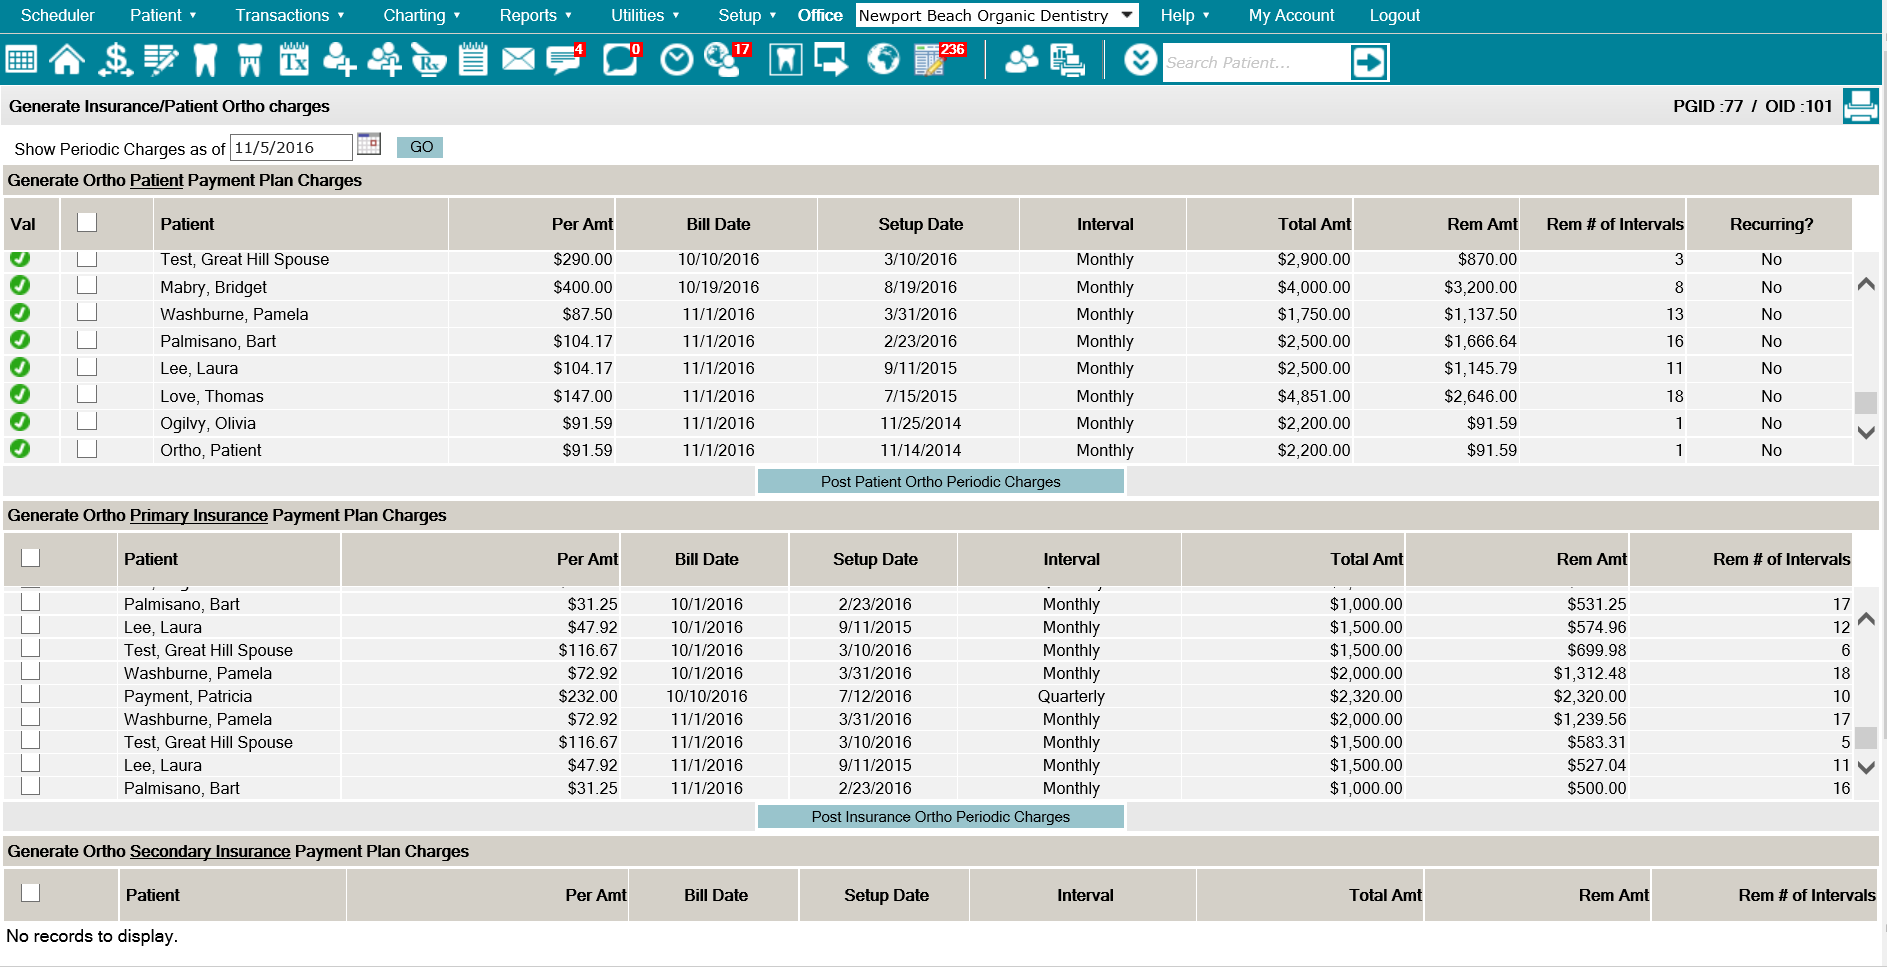
- Utilities / Generate Contract Charges / Generate Ortho Payment Plan Charges
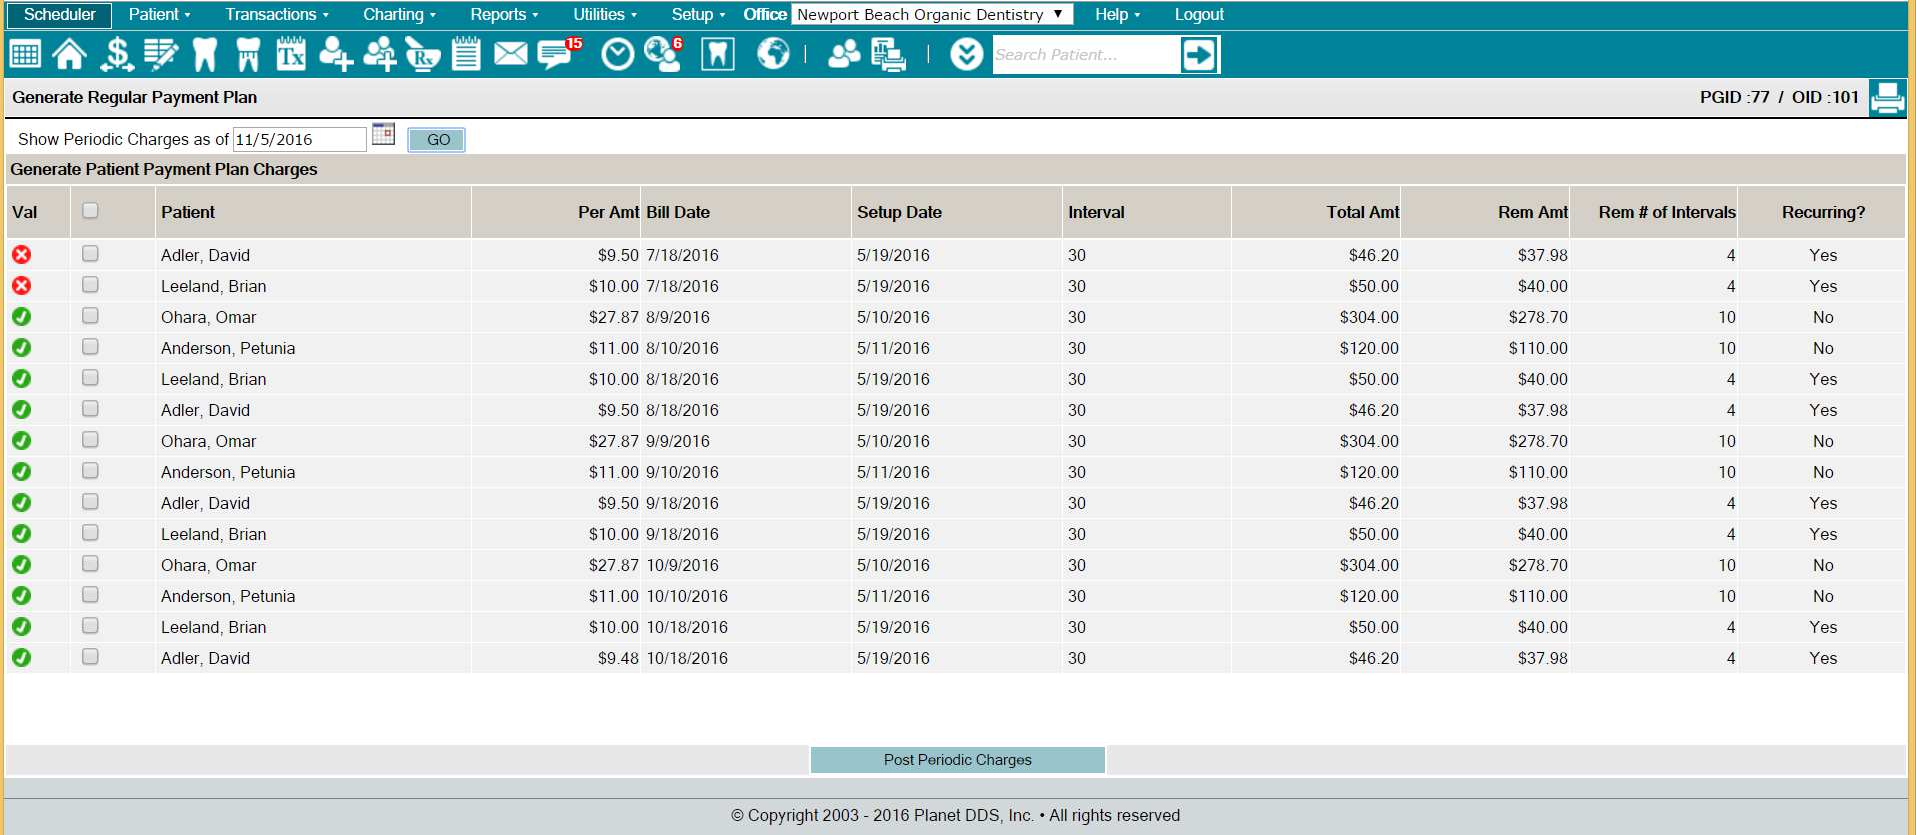
- Utilities / Generate Contract Charges / Generate Regular Payment Plan Charges
- Utilities / Generate Contract Charges / Generate Charges By Practice
On the “Post Insurance/Patient Ortho Charges” and “Post Regular Payment Plan” screens, a list of all the customers currently under contract are seen, along with customer and wallet IDs*.
To post a payment for a customer, check the box next to the customer(s)**, and click the “Post Periodic Charges” button.
If the sale transaction was successful, the name will be removed from the list, and a transaction number can be found in the customer ledger when the payment’s date is clicked.
If the sale was unsuccessful, a red “X” will appear next to the name. To understand the reason for non-processing of the payment, place the mouse cursor over the red “X” to reveal a hovertip for more information.
* Wallet ID is the association that the payment contract is associated with a credit card payment, as designated in the “Recurring?” column as “Yes.”
** It is recommended that all charges due are selected for posting to the Ledger, easily accomplished by clicking the box in the dark header bar.

TERMINAL ERROR MESSAGES
Error Starting Session
System Busy
When a credit card transaction is begun by a computer, the session must be finished before another transaction may be attempted.
If the transaction is not completed, a “System Busy” message will appear if a different transaction is attempted.
If the communication is desired to manually end without processing a payment:
- Access Denticon’s “Setup > Security > Pair 805 Device” screen
- Click the “End Session” hyperlink

GETTING ASSISTANCE
Some errors require escalation, such as:
- Invalid response data
- Decrypt error
- Response timeout
- Connect failure
- CTROUTD is invalid
- Invalid card number
If you experience any of the issues listed above, please forward the details to [email protected]
Please include the error message, payment type, PGID, and Office ID
